
Information Related to Usage Constraints and TelU-Connect Guide
TelU-Connect Internet Access Certificate
For users who want to access the TelU-Connect network but require a TelU Connect network certificate, you can download the following certificate file: download here
Installing CA Certificates on an Android Tablet
Need to install a CA Certificate on your tablet? Here's a guide: Click here
TelU-Connect WiFi Network Access Guide
Using a different authentication system than its predecessors (Employee@TelkomUniversity and TelkomUniversity) which used technology captive portal, here are the steps to connect to the TelU-Connect WiFi network:
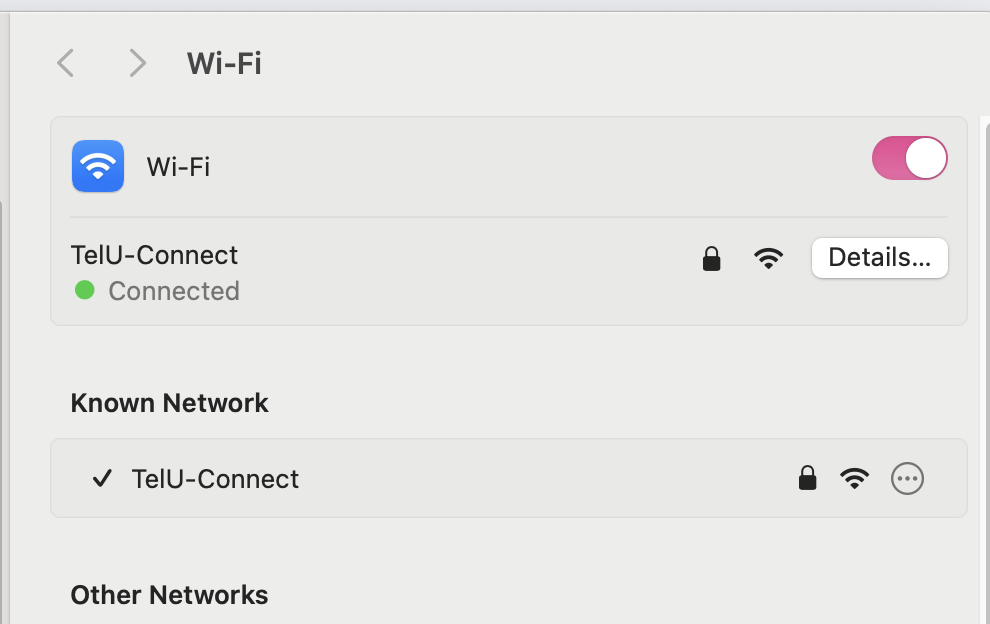
1. Open WiFi settings on your device and select the SSID TelU-Connect
2. Enter username Dan password Thank you in the provided column (example, usernameDoraemon, password: doraemon123!), choose OK, Join, or Connect, then follow the instructions below according to the device you are using
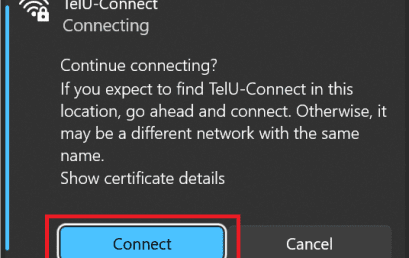
TelU-Connect for Windows
1. The question arises, “Continue connecting?”after selecting OK
2. Choose Connect to connect to the WiFi network TelU-Connect
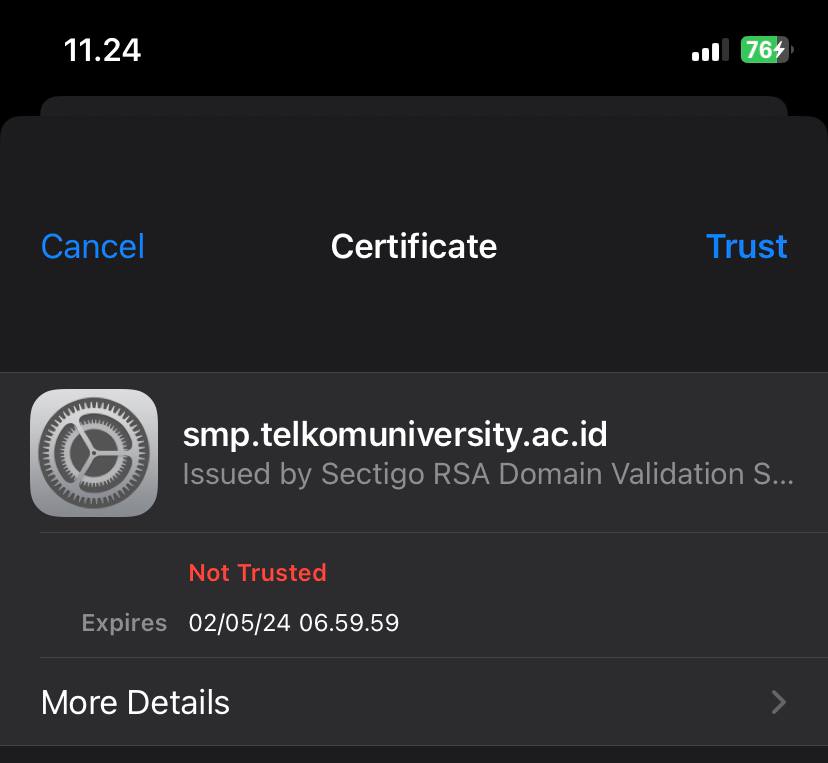
TelU-Connect for iOS
Appear pop-up Certificate after choosing Join
2. Choose Trust to connect to the WiFi network TelU-Connect
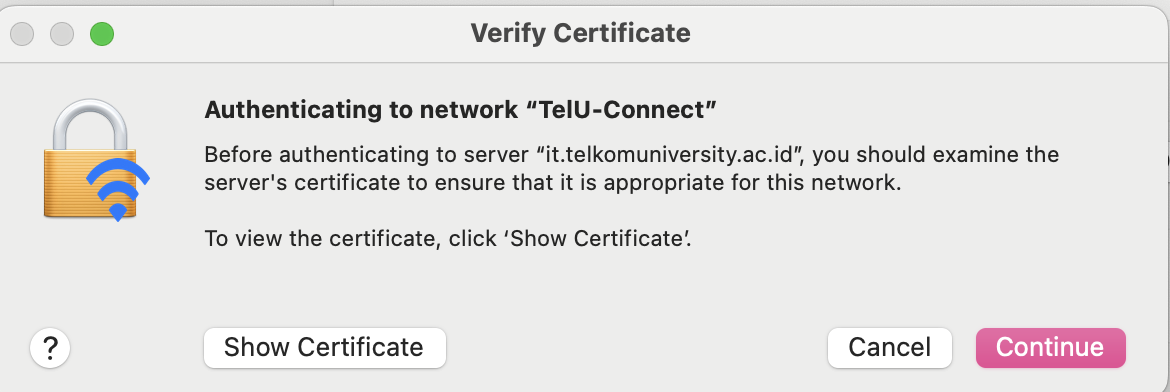
TelU-Connect for MacOS
1. Connect to the WiFi network TelU-Connect
2. Input SSO Account Username and Password, then Click “OK”

3. Certificate License Notification click “continue”
4. If successful, the status “Connected”

TelU-Connect for Linux
- Open Wi-Fi network settings and select a network. TelU-Connect.
- Arrange Wi-Fi security key WPA & WPA2 Enterprise.
- Choose Authentication: Protected EAP (PEAP).
- Let the column Anonymous identity Dan Domain empty*.
- For CA certificate, leave blank or select (None), then check the option No CA certificate is required.
- Choose PEAP version: Automatic.
- Choose Internal authentication: MSCHAPv2.
- Enter Username Dan Password SSO.
- Click Connect to connect to the network.
Important Info!
- If a domain is still needed, please fill it in: radius.telkomuniversity.ac.id
- If there is an anonymous identity fill-in, please emptied Okay. However, if the connection fails, you can try filling in anonymous identity details with your SSO username.

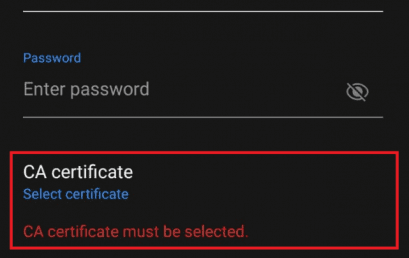
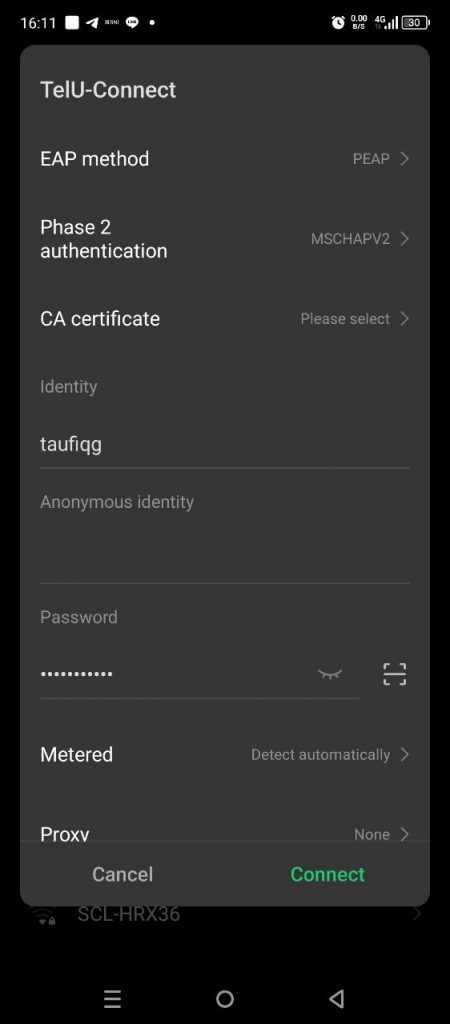
TelU-Connect for Android
1. Enter username Dan password Thank you for the column Identity Dan Password
2. If there is a choice CA certificate, Select Do not validate, then click Connect, or
Important Note: If you change password SSO, please forget SSID TelU-Connect first
Infinix, Realme, and Google Pixel devices
- For EAP method, fill in “PEAP”
- Phase 2 authentication “MSCHAPv2”
- Before proceeding to the CA Certificate, please download the following certificate file first: download here
- If you have clicked CA Certificate, select “Install from Gallery”then select the file that was previously downloaded (Detailed guide Click Here)
- filled “username sso”
- Fill in the password “password sso”
- Choose “Connect”
If a domain is still needed, please enter: radius.telkomuniversity.ac.id
Connect TUNE Visitor/Guest Network Guide
Here are the steps to log in using TUNE Visitor:
1. Using WiFi, select the SSID TelU-Guest
2. Page log in TUNE will open automatically via browser, If page log in doesn't open automatically, access manually via browser
3. Select Visitor Entrance on the page log in TUNE
For the infographic guide, please click the following link: TUNE Visitor Code Infographic
FAQ TelU-Connect Access Issues
TelU-Connect Constraints: “No Internet, secured” or “Can't connect to this network” or “Repeated Login” on Windows Laptop Devices
Here are some things you can do to resolve TelU-Connect or TUNE connection issues with notifications like the one above:
Forget TelU-Connect
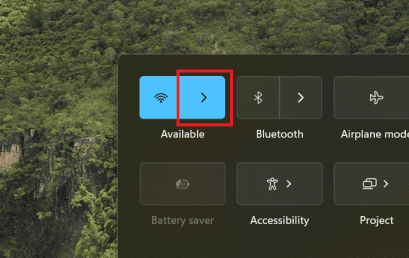
1. Click the button Quick Settings located in the bottom right corner Taskbar Windows.

On the menu Quick Settings, find the button Wi-Fi and click the arrow next to it.
3. Right-click on TelU-Connect
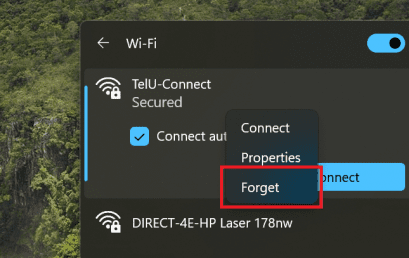
4. Finally, reconnect with TelU-Connect To see if it's connected successfully or not, if not, please proceed to the guide below.
Forget TelU-Guest
1. Open WiFi Settings on the laptop/PC being used
2. Right-click or the icon detail on SSID/network name TelU-Guest
3. Select Forget This Network


Restart WiFi Driver
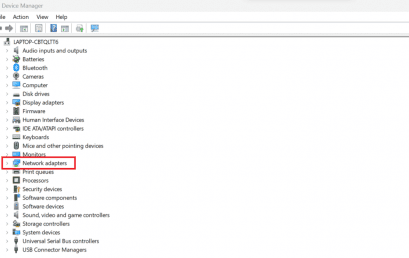
1. Right-click on the logo Windows and choose Device Manager
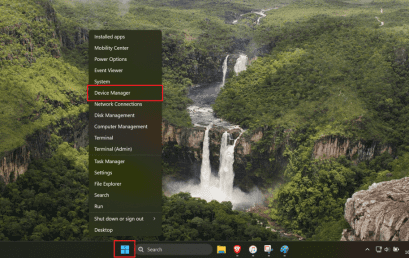
Click 2x Network adapters through Device Manager
3. Select and right-click WiFi driver that exists (name Driver may differ on each device), then click Disable device and choose Yes on prompt that appear
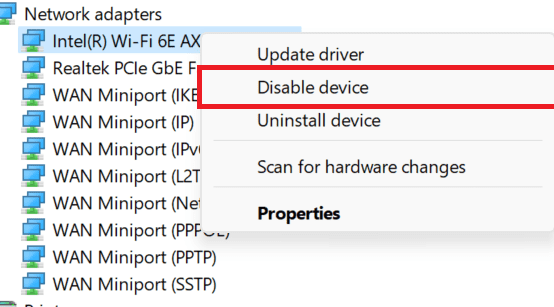
4. Restart Computer, reopen the application Device Manager, Select, then right-click WiFi driver which was previously disabled, then select Activate device
5. Finally, reconnect with TelU-Connect
If TelU-Connect Wi-Fi access is still not connecting, please report your issue via WA Admin IT Service Desk by attaching the identity and location of the TelU-Connect problem.
Troubleshooting Wi-Fi TelU-Connect Access Failure (no internet, secured) on Android HP Devices
Do Forget WiFi TelU Connect
2. If you have already tried logging in again to the TelU Connect SSID. If you still cannot log in, proceed Checking DNS and VPN on a mobile device.
3. Open settings On the mobile device, select Connection
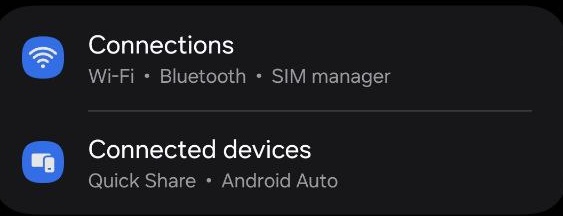
4. Choose “More Connection

5. To VPN setting (NONE) and Private DNS set (automatic)
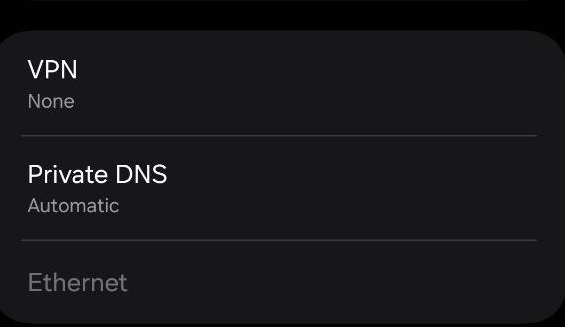
6. For private DNS, choose “automatic”
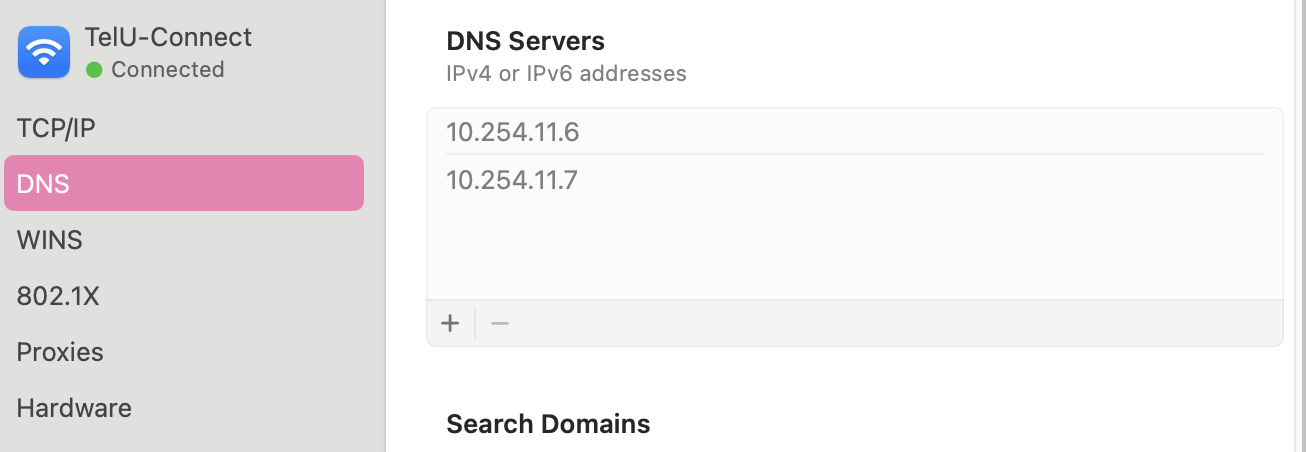
TelU-Connect Obstacles: “No Internet, secured” or “Can't connect to this network” on macOS Devices
1. Please connect to the Wi-Fi network that cannot be accessed, then click “details”
2. Ensure the Tel-U Connect Network IP Status is clear as shown in the image below:

3. Check the DNS section to see if it's set up “automatic” , if the settings “manual” Please change to automatic (static DHCP)
New Students Fail to Log In Tel-U Connect Notification “Unable to connect to the Tel-U Connect network”
Ensure NIK is registered in iGracias. Login Thank you choose menu edit profile search form “citizenship”. If your NIK is still blank, please contact BSLA. https://linktr.ee/bsla_univtelkom
If NIK has been registered by BSLA., Please log in to iGracias and change your iGracias password in the menu. edit profile > account > change password. After changing your password, please try logging into iGracias with the new password. If successful, please try logging into Tel-U Connect again.
Note:
If asked to enter a domain, please fill in smp.telkomuniversity.ac.id
Network Access Constraint via LAN: “TUNE Page is Unreachable” or “This Site Can't Be Reached”
- Click on the menu Begin in Windows, then type “Control Panel” and open the app.

2. Choose “Network and Internet”, then click “Network and Sharing Center”.


3. Click “Change adapter settings” on the left panel.

4. Find adapter LAN that is used, then right-click on adapter mentioned and choose “Disable”. After a few seconds, right-click again and select “Enable”.

5. Wait a moment for the connection to become active again, then try accessing the network or internet again.
Access to the browser feels slow or choppy even though the device is successfully connected to the Tel-U Connect network.
The problem can occur because an application on the device is connected to a VPN, which interferes with access to the Tel-U Connect network. Applications such as uTorrent or BitTorrent.
Please check the device, and if such an application exists, it should be removed immediately so that the connection to Tel-U Connect can run smoothly.
Tel U Connect “Connected” Namun Browser yang Dipakai Tidak Bisa Untuk Mengakses Website Apapun
Melakukan pengecekan DNS pada browser yang digunakan
Cara Mengubah DNS di Google Chrome

- Buka Google Chrome
- Klik titik tiga di bagian pojok kanan atas
- Choose Settings
- Access Privasi dan Keamanan
- Click Keamanan
- Cari bagian Gunakan DNS Aman / Use Secure DNS
- Aktifkan fitur tersebut
- Pilih penyedia DNS: Pilih Default
Cara Mengubah DNS di Microsoft Edge


- Buka Browser Microsoft Edge
- Klik titik tiga
- Choose Settings
- Click Privacy, Search, and Services
- Cari Security
- Aktifkan Use secure DNS
- Pilih provider DNS yang diinginkan
Cara Mengubah DNS di Mozilla Firefox

- Buka Browser Mozilla Firefox
- Klik menu garis tiga
- Choose Settings
- Scroll ke bawah pada bagian Network Settings
- Click Settings
- ChecklistEnable DNS over HTTPS
- Pilih provider DNS yang diinginkan
Masih tidak bisa connect hp infinix. Saved/authentication problem
Siang Kak. Jika memiliki kendala silakan bisa menghubungi kami via WhatsApp agar memudahkan komunikasinya yaa
Kontak whatsapp: +6282319949941. Terimakasih
Saya tidak bisa connect dengan tablet Huawei saya walau sudah mengikuti semua tahap diatas
Jika terdapat kendala akses WiFI TelU-Connect silakan bisa menghubungi tim IT Service Desk melalui WA (https://wa.me/6282319949941). Terima kasih.